Leave Management In Odoo 18
The Time Off module in Odoo, also called Leave Management.It allows businesses to create various leave types, such as Unpaid, sick leave, or parental leave etc.. with customizable rules for accrual, eligibility, and duration. For instance, companies can define accrual policies based on factors like seniority, hours worked, or calendar periods, making it easier to manage leave allocation and tracking.
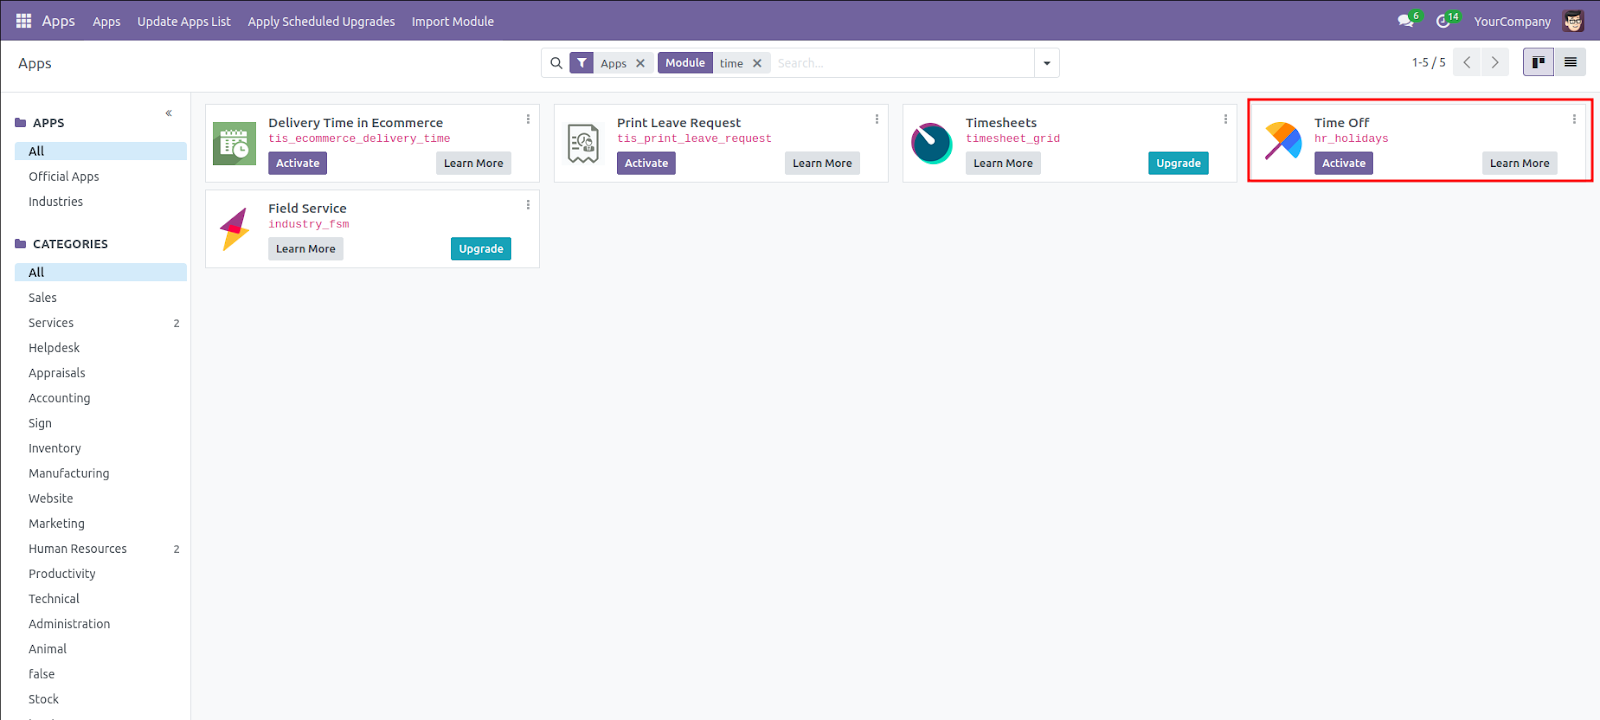
To Set Up the Time Off Module
Login with admin credentials.
Navigate to the Apps menu.
Search for "Time Off"
Click Install to add the module.
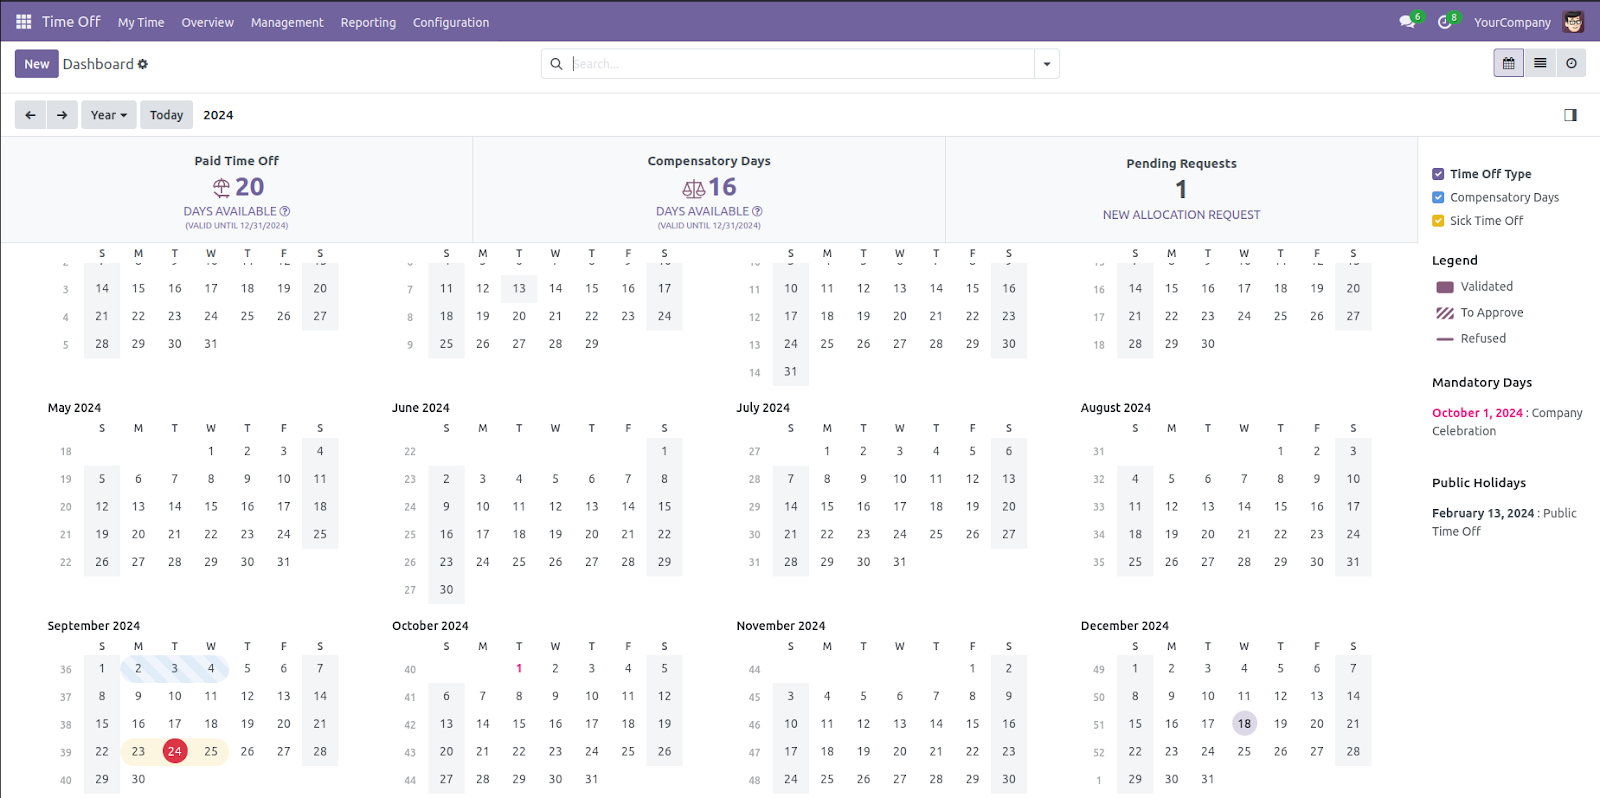
Dashboard
In Odoo 18, the Time Off Dashboard offers a user-friendly interface for employees and managers to manage and track leave requests. Employees can check their leave balance, submit requests, and monitor their status, while managers can review, approve, or reject requests from their team. The dashboard provides a clear overview of leave data, streamlining time-off management.
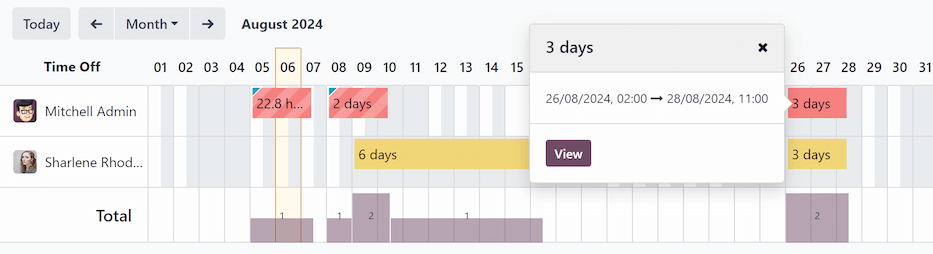
Overview
Navigate to Time Off app ‣ Overview. To change the time period displayed, click on the Month button to reveal a drop-down menu. Then, select either Day, Week, or Year to present the calendar in that view.
To navigate forward or backward in time, in the selected increment Month click the ← (left arrow) or → (right arrow) to move either forward or backward in that specified amount of time.
For example, if Month is selected, the arrows adjust the view by one month.
To return to a view containing the current day, click the Today button at any time.
Management
The Management section of the Odoo Time Off module is designed for users with Time Off Officer or Administrator rights, allowing them to manage and approve time off and allocation requests for their teams. The system ensures all requests go through the appropriate approval process, which may require one or two levels of authorization, depending on the configuration.
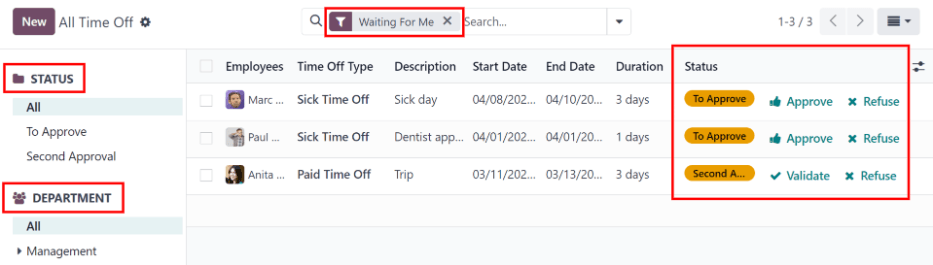
To view time off requests that need approval, select Time Off app ‣ Management ‣ Time Off. Doing so reveals the All Time Off page.
The only time off requests that are visible on this page belong to employees the user either has Time Off Officer or Administrator access rights for in the application.
The default filter on the All Time Off page is Waiting For Me.
This filter only presents time off requests that need to be approved for current employees
On the left side of the All Time Off page, there are various grouping options that can be used to narrow down the presented time off requests, located beneath the Status and Department headings.
Since only time off requests that need to be approved are shown, the Status options are All, Second Approval.
The various departments the user is a member of and manages employees under, also appear on the left side of the page, under Departments.
To only display time off requests for specific departments, click on the Department on the left-hand side of the page. Only requests within the selected department are then presented.
The status column displays the status of each request, with the status highlighted in a specific color.
The Second Approval requests are highlighted in yellow, and are the only ones that appear in the list by default.
If the Waiting For Me filter is removed, all statuses appear,Approved,To Approve , Second Approval
Approved requests are highlighted in green, To Submit (drafts) requests are highlighted in blue, and the Refused requests are highlighted in gray and To approve and Second Approval is in orange color
To approve a time off request, click the Approve button at the end of the line.
To validate a time off request that has already been approved, and is waiting on a second approval, click the Validate button.
To refuse a request, click the Refuse button.
For more details, click anywhere on the time off request line (except for the Approve, Validate icon, and Refuse buttons). Doing so loads that specific time off request form. Depending on the rights of the user, changes can be made.
To modify the request, make any desired changes to the form. All changes are automatically saved.
It is also possible to approve, validate, or refuse the request from this form. Click the Approve button to approve, the Validate button to validate, or the Refuse button to refuse the request.
Allocation(Management)
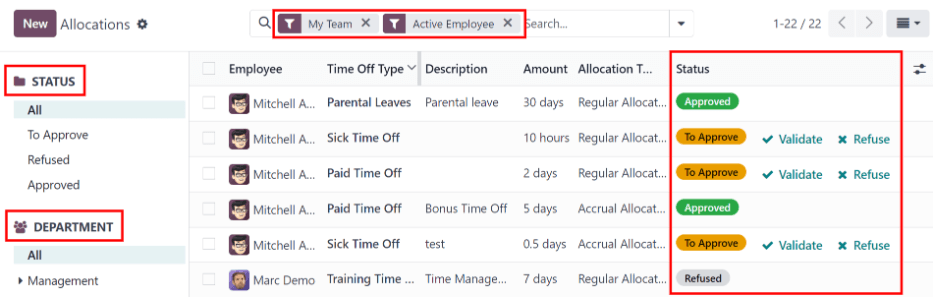
To view allocations that need approval, navigate to Time Off app ‣ Management ‣ Allocations. Doing so reveals the Allocations page.
The user is only presented with allocations for employees they have either Time Off Officer or Administrator access rights for in the Time Off application.
The default filters configured on the Allocations page are My Team and First Approval.
The left side of the Allocations page has various grouping options to narrow down the presented allocation requests.
The Status options are: All, To Approve, Refused, and Approved. Click on a specific Status to view only requests with that specific status.
To view all allocation requests, regardless of status, click All under the Status heading.
It is also possible to display allocation requests by department. Click on the desired Department on the left side of the Allocations page, to only present allocations for that specific department.
The status column displays the status of each request, with the status highlighted in a specific color.
The To Approve requests are shown as yellow, Approved requests are shown as green, and the Refused requests are shown as gray.
To approve an allocation request, click the Validate button at the end of the line. To refuse a request, click the Refuse button.
Configuration
In order to allocate time off to employees, and for employees to request and use their time off, the various time off types must be configured first then allocated to employees
Time Off Types
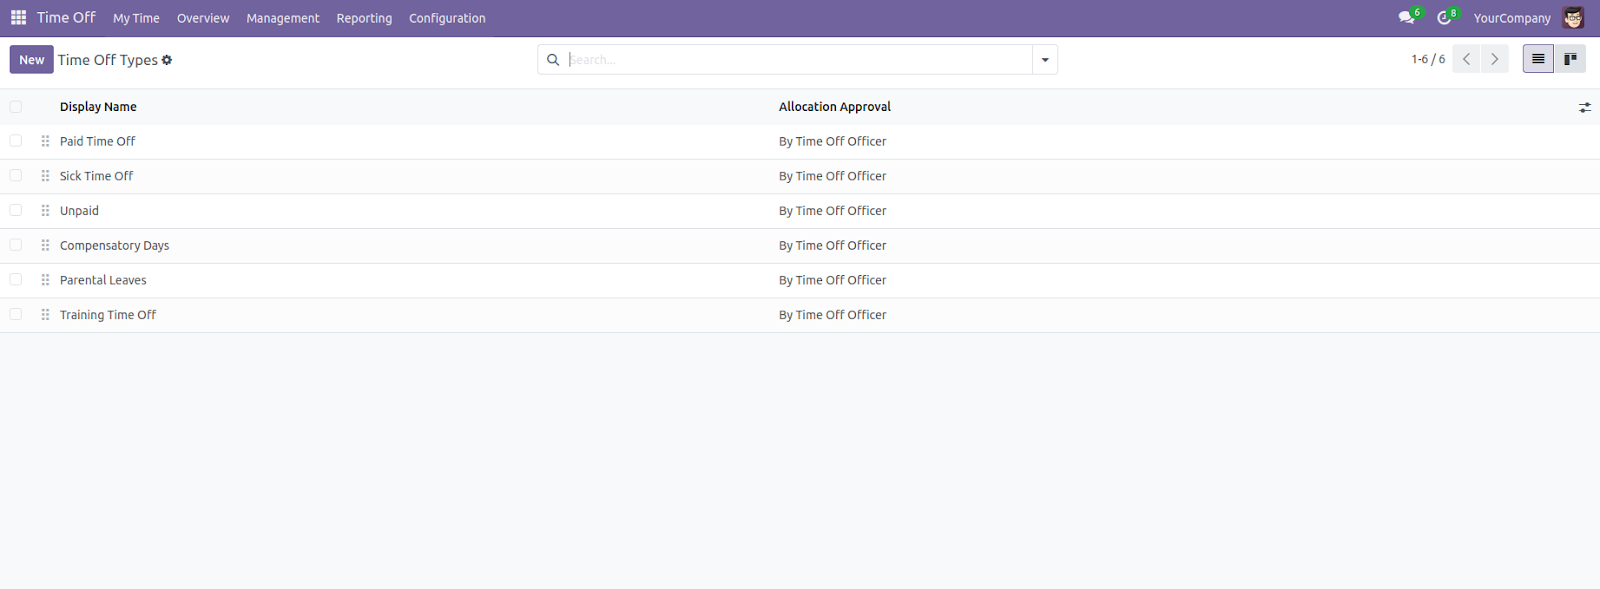
Creating a new leave type, such as vacation, sick leave, or special leave, is straightforward and helps categorize employee time off. Navigate to the Configuration menu and select Time Off Types. Here, you can manage existing leave types or create new ones. Click Create to define details like the leave type's name, approval workflow, and allocation method. Once saved, employees can select the new leave type when submitting time off requests.
Create time off type
To create a new time off type, navigate to Time Off app ‣ Configuration ‣ Time Off Types. From here, click the New button to reveal a blank time off type form.Enter the name for the particular type of time off in the blank line at the top of the form, such as Sick time vacation etc... Then, enter the following information on the form.

When creating a new Time Off Type in Odoo, several fields need to be configured to properly define the leave type.
Time Off Requests Section:
Name: Define the leave type (e.g., "Vacation," "Sick Leave," or "Maternity Leave") as the label employees see when requesting time off.
2. Approval: Choose the approval process for leave requests:
No Validation: No approval is required.
By Time Off Officer: Approval is required from the assigned time off officer.
By Employee's Approver: Approval is required from the employee’s direct manager.
By Employee’s Approver and Time Off Officer: Dual approval from both the employee’s approver and the time off officer is needed.
Allocation Requests Section
Requires Allocation: Decide if leave allocation is mandatory before submitting time off requests:
Yes: Allocation is required.
No Limit: No allocation limit applies.
Configuration Section
Notified Time Off Officer: Select the person responsible for approving requests and allocations for this time off type.
Take Time Off in: Choose the format for requesting time off:
Day: Requests in full-day increments (e.g., 8 hours).
Half Day: Requests in half-day increments (e.g., 4 hours).
Hours: Requests in hourly increments.
Deduct Extra Hours: Enable this to factor in accrued extra hours when processing time off requests.
Public Holiday Include : Enable this to Include public holidays
Show on Dashboard : Enable this to include this part in DashboardAllow to Attach Supporting Document: Enable to let employees attach documents to requests, useful for cases like medical leave.
Kind of Time Off: Choose the type:
Worked Time: Counts as worked time for accruals.
Absence: Does not count toward accruals.
Company: Select the applicable company if using a multi-company database. Leave blank for all companies.
Payroll Section
Choose a Work Entry Type to link the time off type to entries in the Payroll app.
Display Option Section
Color: Select a color for the Time Off dashboard.
Cover Image: Choose an icon for the Time Off dashboard.

Accrual Plans
Accrual plans allow employees to earn time off based on their worked hours, days, weeks, or other time increments. Here's how to set up and configure an accrual plan in Odoo
Steps to Create an Accrual Plan
Navigate to the Accrual Plan Section:
Go to the Time Off app, then Configuration ‣ Accrual Plans.Click "New":
This opens a blank form to create a new accrual plan.
Fields in the Accrual Plan Form
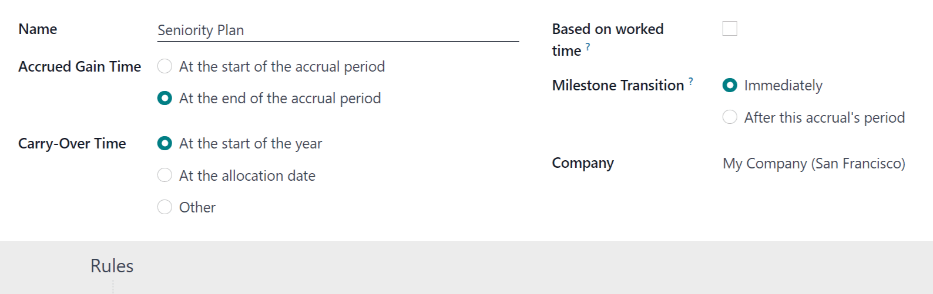
Name:
Enter a descriptive name for the accrual plan (e.g., "Annual Leave Accrual").Accrued Gain Time:
Specify when employees begin to earn time off:At the start of the accrual period
At the end of the accrual period
Carry-Over Time:
Choose when unused time off rolls over to the next period:At the start of the year: Rolls over on January 1.
At the allocation date: Rolls over as soon as time is allocated.
Other: Lets you set a specific carry-over date. If selected, two additional fields appear to set the day and month of the roll-over date.
Based on Worked Time:
Enable this option if time off accrual depends on hours worked. Time not counted as worked (e.g., absences) does not contribute to the accrual.Milestone Transition:
This field becomes visible after configuring at least two rules.Specify when employees advance to the next milestone:
Immediately: Transitions occur as soon as employees qualify.
After this accrual’s period: Transitions occur after the current pay period ends.
Company:
(Visible in multi-company setups) Select the applicable company. Leave blank to apply the plan across all companies.
Public holidays
Public holidays can be configured in Odoo to ensure employees are aware of non-working days and to prevent unnecessary time-off requests on these days. These holidays are also reflected across other apps that use working schedules, such as Calendar, Planning, and Manufacturing, making it essential for accurate scheduling.
Steps to Create a Public Holiday
Navigate to Public Holidays:
Go to the Time Off app, then Configuration ‣ Public Holidays.View Existing Holidays:
A list view displays all previously configured public holidays.Create a New Holiday:
Click the New button.
A new line appears at the bottom of the list.
Enter Holiday Details:
Fill in the following fields:
Name:
Enter the holiday's name (e.g., "New Year’s Day").Company:
(For multi-company setups) The field is pre-filled with the current company and cannot be edited.Start Date:
Use the date and time picker to select when the holiday begins.Default: Current date and the company’s working schedule start time.
Note: Adjusts automatically for users in different time zones.
End Date:
Use the date and time picker to select when the holiday ends.Default: Current date and the company’s working schedule end time.
Note: Adjusts automatically for users in different time zones.
Working Hours:
If the holiday applies only to employees with specific working hours, select the schedule from the drop-down menu. Leave blank to apply the holiday to all employees.Work Entry Type:
(If using the Payroll app) Select how the work entries for the holiday are recorded in Payroll from the drop-down menu.

Mandatory days
Mandatory days are special days when specific departments, or the entire company, are required to be present, and employees cannot submit time-off requests for these days. These days can be configured for the whole company or for specific departments.
Navigate to Mandatory Days:
Go to Time Off app ‣ Configuration ‣ Mandatory Days.Create a New Mandatory Day:
Click the New button in the top-left corner.
A blank line will appear in the list.
Enter Mandatory Day Details:
Fill in the following fields:
Name:
Enter the name of the mandatory day (e.g., "Company-Wide Annual Meeting").Company:
(For multi-company setups) The current company is pre-selected, but you can choose a different company from the drop-down menu if needed.Departments:
By default, this column is hidden.
Click the additional options icon (three dots) in the top-right corner next to Color and tick the Departments checkbox to reveal this column.
Select the departments for which the mandatory day applies from the drop-down menu.
You can select multiple departments, and there is no limit to how many you can choose.
If left blank, the mandatory day applies to the entire company.
Start Date:
Use the calendar picker to select the start date of the mandatory day.End Date:
Use the calendar picker to select the end date of the mandatory day.For a single mandatory day, the end date should be the same as the start date.
Color:
Select a color from the available options to visually represent the mandatory day on the Time Off app dashboard.If you do not wish to assign a color, choose No color (represented by a white box with a red diagonal line).

The Reporting feature in the Odoo Time Off module provides insights into employee leave data, allowing managers and HR personnel to analyze time off trends either by employee or by type of leave. It enables users to track who is taking time off, the duration of their leave, and the types of leave being utilized.
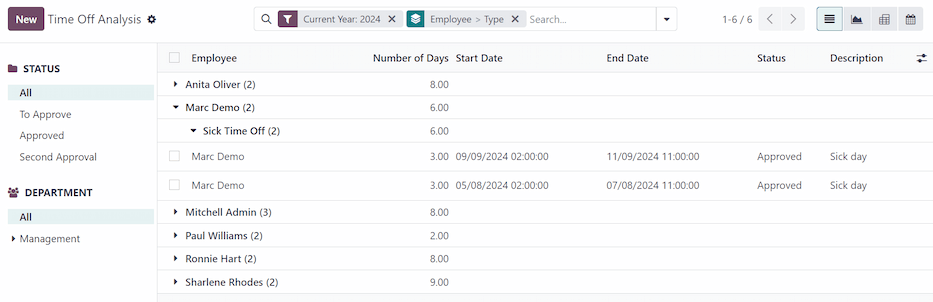
By employee
To view a report of employee time off requests, navigate to Time Off app ‣ Reporting ‣ by Employee.
The default list view displays:
Employee name
Number of Days off requested
Start Date
End Date
Status
Description
Each employee’s line is collapsed by default; expand it to see time off requests categorized by type. Further expand a type to view individual requests.
Switch between views using the buttons in the top-right corner:
List (default view)
Graph
Pivot table
Calendar
.
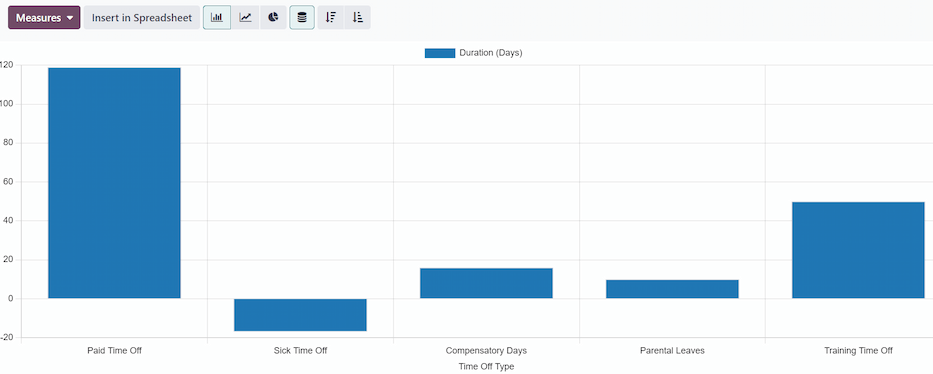
By type
To view a list of all time off, organized by time off type, navigate to Time Off app ‣ Reporting ‣ by Type.
The default view is a bar chart, showing time off requests by type.
Hover over a bar to see the total duration (days) for that leave type.
Click a bar to open a detailed list view of all requests for that leave type.
Switch between views using the buttons in the top-right corner:
Graph (default view)
List
Pivot table